Friday, 30 December 2011

Last Outfit Post of 2011.


Hoodie: Gifted
T Shirt: Market Shop
Skinnies: Peacocks
Necklace: Claire's Accessories
Boots: eBay

Today, I felt a bit down, because lately I hadn't been feeling to well, so my dad offered to take me to the local Chinese grocery shop, so I wore my make up, my favorite skinny jeans and walked around the place feeling really good about myself in them as well :). I don't know why, but I seem to have been leaning over to the dark side in terms of colour lately; I rarely wear colour anymore- maybe it's the seasons and all that.. but I'm not used to that! 

I didn't get my face stuffed this Christmas, and I do plan on losing some weight next year, but I can't commit to anything, so let's see what happens on that front!

What I love most about this outfit is the boots- they were so cheap- they were £8 (including shipping) and they were the last few pairs in my size, so I was fortunate to get them- yayyy! 

Wednesday, 28 December 2011

Christmas Timesss.


I loved Christmas at my house; my uncle and my cousin came round, and we had a lot of presents between us! The present I loved the most was my new wicker basket for my bike- I have wanted it for so long! It took a while to put it on though, as the parts were meant for a road bike, and mine was a mountain bike, but I cracked it in the end, like I always do! 

Every Christmas, we always have a mix of both African and English food- it has to be done! I love English food, but I enjoy African food more on occasions like this :). We didn't have a turkey dinner either, it's just really dry, so we usually have a chicken roast dinner- is that wierd? 

Anyway, it ended up with everyone watching all the Christmas specials of all the soaps, quite a way to end an awesome day! 

Katherine xo

Outfit Post

Gorsh, it has been such a while since I did a proper outfit post! But I loved my winter outfit so much, I had to share it!


Faux Fur Headband- gifted
Cardigan- gifted
Vest Top- Select in Guildford
Jeans- gifted
Shoes- gifted

Well, as you could see, most of my outfit is gifted, it's great how Christmas presents all go together so well!

I also loved the faux fur headband that my sister got me for Christmas, as I usually can't wear hats as I have short hair and don't like myself in them, so I make it up in characteristic headbands. This is a nice in-between; it does the job but makes a statement! 

The cardigan was made from that annoying itchy fabric, so I had to wear another cardigan underneath, and it actually kept me warm! I was so happy I didn't have to wear a jacket.

Katherine xo


Friday, 23 December 2011

DIY 2012 Wall Calendar.

I got this idea on such a random whim today, and I thought I'd share this with you all! I don't normally use Calendars, but I thought that this would be a first, as it would have been made in a creative way, and won't cost me a single thing.


So, here is what you will need:

- A large image that you're willing to crop; i.e. a photograph, magazine cutting or in my case, I'm using my sketchbook work from first year of uni.
- Scissors
- Graph Paper
- Plain White Paper
- Glue
- Pen
- Pencil
- Ruler

Step 1) with your ruler and pencil, draw a square around the selected part of your image.

Step 2) With your scissors, cut out the image.

Step 3) Stick down your image in the centre of your page.

Step 4) Use a Calendar off Google and write out the months and stuff onto the graph paper, and then cut them out and stick them to the plain paper. At this point, If you want to go the extra mile and you want to use it as a gift, get some foam board (you could get this from any craft store) and stick it onto that. It will give a more professional, artistic look when this is done. :)

Let me know if you make this!

Katherine


Monday, 19 December 2011

New Series: Blogging for confidence and self love.


So, I'm thinking of starting a new blog series... actually not thinking, I am going to do it, because I feel it's necessary for me. I have had a really tough couple of years, and it's really destroyed the confidence I had, which was hard for me to even build up in the first place when I were younger.

Recently, I have constantly been held back by my shadow of self-doubt whenever I want to try new things, or be spontaneous, or just trying to 'fit in' or make everyone happy, and to be honest, I've just had enough of that, because I feel like I'm just trapping myself inside my shell.

So, I have been reading the '100 ways you can start loving yourself' post by Gala Darling, who's a blogger, promoting radical self love, and it seemed like such a cool idea to just start doing these things and try and change my life for the better :).

Katherine xo

Saturday, 17 December 2011

DIY Post: Handmade Notebook

Christmas is almost here, and if you're like me, you would have just remembered to go shopping for your loved one when you realize you have absolutely no money till January. 

Well, this is where this DIY comes in. If you know anyone that writes, this would be an excellent present to them- or if you're a scrapbook-er or an artist this is the best, easiest way to create one- and for free, because it's using objects already in your home!


What you will need:


- printing paper (mine is sainsbury's basics, you can get a pack of 500 for less than £5)
- a piece of cloth big enough for your paper
- scissors
- hole punch
- yarn needle
- knitting yarn
- double sided tape

1. fold your piece of paper (a bunch of 16 sheets) in half, and really make sure you really create that crease, as it will help you later on when you assemble your notebook.

2. in small quantities (or as much as you can fit under your hole punch) make the holes about an inch away from the edge, then move the hole punch about an inch upwards, and punch again.

- if it helps, to make sure that your paper holes are equal, if you are doing smaller quantities, you could mark the desired place in with a pencil, before making the holes.

3. add your double sided tape and add it to the edges of 1 sheet of paper, then peel the paper off and stick it in the centre of the fabric. 

*if you are really lazy, then spray glue does the trick also- just remember to let it dry first before getting excited and try and stick it down too early, because it ruins your paper!

4. stick your double sided tape around the edges of your fabric and fold it onto itself.

5. fold the sheets about 1cm away from the hole and place it in the middle, and sew it through. If you want your notebook to be bulky at this point, add another 2 bunches of 16 pages and put them on both sides of the pages in the middle- and that's your notebook!


I hope this all makes sense, I'm kinda half sleepy whilst writing this, so forgive me if it doesn't make sense! But give it a try and see what happens.

Katherine

Tuesday, 13 December 2011

Shop Update.


I have some new stock in my shop- at last!  I have a lot more to give, but I'll limit that until the 27th, as I have a lot to do! But I have enjoyed jewellery making, its quite therapeutic! And I have missed my beloved sewing, so it has been wonderful getting to create some great things again after such an absence. :)

I so would like to just thank everyone who has supported me and my business over this year that I have been taking it really seriously. I feel really appreciated as a designer, and I hope to get more sales, and more money to fund my dreams towards full-time self-employment after I graduate. Without your support, I really couldn't have done this. So thank you so much- you bunch of lovely people! <3

Katherine xo

Saturday, 10 December 2011

My week in iPhone pictures.

Hey Guys-

As Christmas is approaching, there is more work to do, both at uni and with my business! I haven't really been as organised as I should have been recently, I need to start using my iPhone to put my to-do lists on because I really don't remember to look in my to-do list notebook, it's terrible!

Anyway- here is a snapshot of what I have been up to...

More recycled rings. I really love jewellery making! :) (Taken with instagram)

I now make rings! I love jewellery making, I think doing my work placement with Tatty Devine in May was the absolute best thing I could have ever done, because it sort of unleashed a new excitement within me, even a little bit more than fashion atm! and when combined with recycling, it is so awesome! Please have a look at the stuff I have in the shop already, but I will be adding a TON of new jewellery, should the weather be good enough to take good pictures in the natural light.

My beloved weave. In the world of textiles, I don’t see myself as a fashion textiles designer anymore, I think I’m more inclined to interior textiles- it seems to be the way forward with my designs ;)

Yes, I weave. This is one of my final pieces for my 3rd year project. I'm excited to finish everything... and I hope I get to put this in my exhibition next year! :)

boredom pic… okay time to do my dissertation stuff now, lol.

I have done a lot of procrastinating lately- it's really not good, but can't be helped! I just really wanna break up for christmas already, lol. I have also been thinking of a new look lately, as I feel like I've outgrown a lot of the clothes I've got lately... has anyone been through this stage lately? cos of this I have been shopping a little bit, and customizing some of the clothes I wear to go with my quirky/bohemian/edgy/confused dress sense!

Katherine x

Wednesday, 7 December 2011

Style Me Wednesdays #01

Hey Guys,

So I have decided to embark on a new blog series, where I take a piece of my clothing from my shop, and style it in a way that could be worn... I do realise that in my shop, it is hard to tell how to wear my items as all my pieces are on the mannequin, so this would be totally easy for you guys to see, and fun for me to dress up! :)

Here we go!


This is such a lazy day outfit, but it is so effective.

I threw this on in a bit of a hurry, but I love that I wore my recycled halterneck top, with my primark long sleeve and jeans and uggs... It's so cosy, and something I'd love to be wearing around the house when I'm sewing or even just to go out shopping in! :)

You could really wear this with any casual outfit- it may be worn with a vest top and cardigan to really dress really cosy this winter!

Its very much something of a indie nature, but with a feminine twist.

I loved doing this, and I hope to really do some more, as I feel it is a really wicked way to see my shop pieces worn in the flesh.

Katherine xo


Saturday, 3 December 2011

DIY Post- Recycled Pillow Case Tote Bag

Hello Lovelies!

It's been such a while since I last did a blog post, again, life has been full of many, many distractions lately, and I haven't really been motivated again... I think I've been feeling a little lost lately, but I've now got my head screwed back on and I'm ready to work harder than ever, so expect to see a lot more blog posts like this DIY one, and the Much Love Mondays series, and a new one coming up pretty soon-ish! ;)

Anyway- As a broke-as-a-joke student, I love finding ways to get stuff on the cheap, and creating this bag which is excellent for me to use to Uni, but you lovely people could use it for shopping too- why get a plastic bag that could fall apart easily, when you have a fabric bag that is strong and would last you several shopping trips? :)


- tailoring pins
- scissors
- a sewing machine
- a pillow case

Step 1)

Cut a big strip from the pillowcase; a strip that would be big enough to later on cut into 4 decent sized strips for the handles.


Step 2)

pin across two strips and then use your sewing machine and sew them together, to make a long handle.
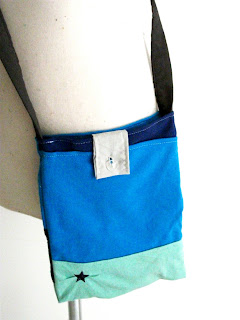
Step 3)


Fold the piece over itself and pin again to get a securely sewn handle. Machine stitch across here.
Repeat Steps 2 & 3 for the second handle.


Step 4)
Pin around the end of your pillow case to make the top of the bag, and sew.

Step 5)

Pin the handle onto the bag, and sew around the handle and diagonally across to double secure it.

Ta-dahhh! :) Here is my easy-peasy-lemon-squeezy DIY bag!

It's quite a cute piece, I think, and you're bound to create a more imaginative and original piece this way!

I hope this is easy for you lovelies, and let me know if you do create this!

Katherine