Friday 23 March 2012

DIY Fridays: Tote Bag

Here is a cool DIY for those, like me, love bags! I personally use this one for mailing everyones lovely packages from my shop. :)


Here is what you need:
- Scissors
- Pins
- Old T Shirt
- Sewing Machine
- Overlocker (Optional)


1) Cut the T-shirt, from just below the arm holes. This will be your top of the bag.


2) Cut the sides of the t shirt. 

3) If you want to, you can cut curves in the sides as well, to make it a scoop-type bag.

4) With your pins, secure your fabric along the edges.

5) Sew along all the edges, except for the top.

6) This would be the time to overlock the sides, just to stop it from falling apart. If you don't own an overlocker, you can just sew over the stitches you just did again to double-secure it. :)

7) Sew all around the top of the bag.


8) Start cutting your straps. You can make them as small or wide as you want.

9) Fold it on itself and pin and sew along/overlock.

I hope you love this tutorial :)

Katheine xo


Thursday 22 March 2012

New Jewellery


I made some new jewellery for the shop! I don't know why, but I love to make jewellery lately, it is so therapeutic. BUT I also miss sewing. I'm just ordering some new thread then after that, I'll list a whole tonne of clothing, you will love them all :).

Come and snap a few pieces?

Katherine xo

Tuesday 20 March 2012

My little getaway...

Hello lovelies-

Just a quick post to update you on my shenanigans that I've been up to whilst I've been away.


I went on a University trip to Milan in Italy, and it was sooo inspirational and lovely! I was mostly excited because it was my first time abroad in about 4 years, and my final major project was stressing me out so much- a getaway was long overdue! We walked everywhere, ate everywhere... it was quite the adventure. I even drank a few cappuccinos... which is quite the stretch for me because I can't stand anything that tastes like coffee apart from a frappuccino! I actually tried a cappucino when I got back to Uni and it really wasn't the same taste at all, it was very bitter! :(.

I spent quite a lot of money out there, but I did come back smiling, even though I was completely knackered! The weather was also very lovely, totally got me in the mood for the Spring season. Me and my friends also climbed up to the very top of the Cathedral... was such a good feeling, I could have stayed there all day because the view from up there was so awesome.

Anyway- lots of new DIY's to come starting from this week. I think I'll start scheduling them so that I won't have to worry about keeping this blog updated. Also- lots of jewellery and bags coming into the shop this week, so I hope you love what's about to come.

Katherine xo

Sunday 11 March 2012

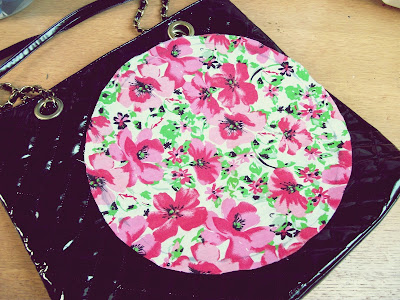
DIY Fridays (on a Sunday) Embellished Handbag

This has been a long time since I last did a DIY! And this time, it requires no sewing! So anyone who isn't very confident in sewing can easily do this with minimal problems.


Anyone who knows me, knows that I hate to fit in, fashion wise, and do almost anything to stand out. I had this bag for a while, and although it's lovely, because it was bought from Primark, everyone had the same thing- in my town centre I counted at least 6 people having the same bag! *face palm*. Although I love a good bargain there, I still wanted to get an individual twist to it.

You will need: 
- Glue gun
- Fabric
- Scissors
- Any bag you're bored of having.


*sorry I haven't shown you how I cut the fabric, but it's really simple; just mark a circle with a pen/pencil/crayon/tailoring chalk and cut it out. If, like me, you're not good with doing a perfectly round circle, you could get something circular and trace it. :)

1- Carefully put the glue on the edges of your fabric circle.


2) Stick your fabric to your bag- if it helps you can get an extra pair of hands as the glue is quite hot and hard to do it at this size!


3) Put the glue onto the next fabric for the trimming. You can use denim, like me, if you want to, but I just used it because I had some scrap fabric lying around.


4) Fold the fabric as you're going along, as if you're making pleats, gluing the back of the pleat so it doesn't open up.
5) Stick the back of the trim onto the fabric onto the circle, so it doesn't move about.


This is how your bag should be looking :)

6) Keep on doing this all around the circle.


7) To stick it firmly in place, glue all the way around the outer and inner edges of the trim, and TA-DAH, you have your jazzed up bag, all ready for the spring/summer season and whatnot.

I hope you find the DIY post as easy as I thought it was, but if you have any problems, let me know! :)

Katherine xo

Saturday 3 March 2012

New earrings in the Shop!


I have stocked up in the shop at last! I spent the whole of Monday night making these button ear studs, in a variety of sizes and colours. I think there is a slight obsessions with buttons, but I don't mind, it still adds to any outfit, whether it's casual or slightly dressed up! There are about 49 pieces made, but 10 pieces a day will be added so that there's time to make other pieces as well.

 I have come across some excellent news in the past couple of days, and if it goes to plan, then you will ALL  know about it! It is one of my biggest wishes, and fingers crossed, it will come true!

There will also be a new ring collection for the shop as well, and I'm hoping to get those released at some point next week, or in about 2 weeks when I come back from my trip, on Friday 23rd March which is comes to this say- if you want to get anything, NOW is the time to do so, because I will not dispatch anything bought between the dates of 12-15th March will not be dispatched till 19th March, upon return and recovery.

Katherine xo